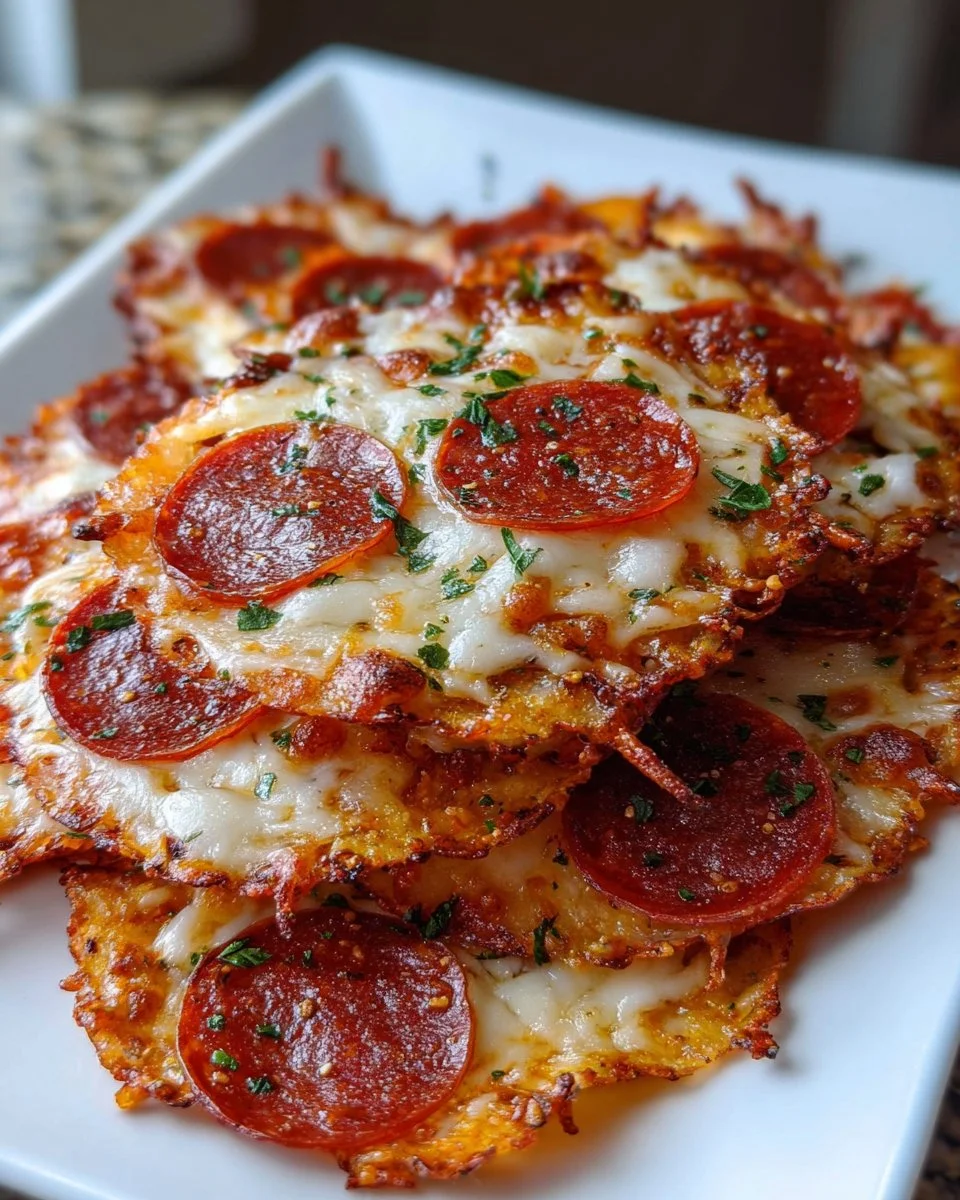
Imagine walking into a cozy kitchen on a crisp afternoon, the sun streaming through the window, casting a golden hue over the countertop. The aroma of melting cheese mingles with the savory scent of spicy pepperoni, enticing you to take a step closer. You absentmindedly nibble on a warm pepperoni cheese crisp, the satisfying crunch echoing in your ears as the rich, creamy cheese fills your mouth with its deliciousness. Each bite bursts with flavor, a perfect harmony of textures, making it impossible to stop at just one. These aren’t just snacks; they’re bites of culinary bliss, perfect for any occasion.
The magic of pepperoni cheese crisps lies in their simplicity yet bold flavor. As you savor the crispness of the pepperoni, the combination of three different cheeses coats your palate with a luxurious creaminess. This delight is more than just a treat; it’s an experience meant to be shared with friends during game nights, enjoyed as an appetizer before a dinner party, or simply munched on while cozying up on the couch with a good movie. If you’re in search of a snack that combines crunch, spice, and indulgence, look no further. These crisps will undoubtedly become your new favorite guilty pleasure.
Why You’ll Love This Pepperoni Cheese Crisp
You can’t help but love the versatility and sheer delight of this recipe. These pepperoni cheese crisps perfectly balance decadence with comfort, making them perfect for many occasions. Whether you’re hosting a mini get-together or simply craving something savory to snack on at home, these cheesy bites cater to every craving. The bubble of the melted cheese meets the crispiness of golden pepperoni, resulting in explosions of flavor that delight the senses. As the cheese crisps cool, they retain just the right amount of crunch, ensuring that each bite is as satisfying as the last.
Moreover, the dish is tailored to your preferences. Don’t shy away from experimenting—add spices, herbs, or your favorite cheese blend. The possibilities are endless. With a handful of ingredients, you’ll create a dazzling treat that stands out on any platter or buffet. Offering both taste and texture, these crisps leave an imprint on the heart and palate, making you the star of the kitchen.
Preparation Phase & Tools to Use
To embark on this culinary journey, a few essential tools will guide you along the way. First, a baking sheet lined with either parchment paper or a silicone baking mat is crucial. This ensures easy removal and cleanup, keeping your crisps from sticking. A mixing bowl brings together your cheeses and seasonings. A good mixing spatula or spoon will work beautifully to combine everything into a creamy blend.
If you wish for your crisps to have a uniform shape, scissors or a knife will help you cut your pepperoni slices to the perfect size. Finally, an oven thermometer will ensure that your oven is at the correct temperature, providing an even bake.
Tips for preparation are just as vital as the tools themselves:
- Grate Your Cheese: Freshly grated cheese melts and bubbles better than pre-packaged options.
- Slice Pepperoni Wisely: Larger pepperoni may need to be halved or quartered, depending on your preference and desired crispiness.
- Space Out Wisely: Remember to leave some space between each pepperoni. This promotes even cooking and allows each crisp to develop its signature crunch.
Ingredients for Pepperoni Cheese Crisps
- 1 cup shredded mozzarella cheese: The melted, gooey texture gives these crisps their backbone.
- 1/2 cup shredded cheddar cheese: Adds a tangy richness that complements the spices.
- 1/4 cup grated Parmesan cheese: This cheese introduces a sharp, nutty flavor that rounds out the mix perfectly.
- 40-50 slices of pepperoni (approximately 4 ounces): The star of the show; its bold flavor and texture contrast the cheese beautifully.
- 1 teaspoon Italian seasoning: A simple sprinkle that enhances the overall flavor profile.
- 1/2 teaspoon garlic powder: This ingredient elevates the dish, adding depth and aroma that lingers.
- Optional Ingredients:
- Red pepper flakes: For those who love heat, these flakes boost the spiciness factor.
- Fresh parsley, chopped: This fresh herb adds a pop of color and brightness when garnishing.
If you’re running low on certain ingredients, feel free to swap them. Swap out mozzarella for gouda or cheddar for pepper jack to spice things up.
How to Make Pepperoni Cheese Crisps
Creating your very own crispy wonder is straightforward. Follow these enticing steps and watch as your kitchen transforms into a haven of savory scents.
-
Preheat the Oven: Set your oven to a warm 375°F (190°C). This temperature creates the perfectly melted and bubbly cheese while crisping the edges of your savory slices.
-
Prepare the Baking Sheet: Line a large baking sheet with parchment paper or silicone baking mat. This critical step prevents sticking and makes cleanup a breeze.
-
Mix the Cheeses: In a medium bowl, combine the shredded mozzarella, cheddar, and Parmesan. Use a mixing spatula to blend the cheeses well, ensuring that they marry seamlessly.
-
Season with Flavor: Add Italian seasoning and garlic powder to the cheese mixture. Toss to ensure every piece is kissed with flavor. Don’t forget to sprinkle in some red pepper flakes if you crave a hint of heat.
-
Prepare the Pepperoni: If your pepperoni slices are generous, cut them in half. This will make them easier to manage and provide a better surface for the cheese to adhere.
-
Arrange and Layer: Lay the pepperoni slices in a single layer on the prepared baking sheet, making sure to leave a bit of space between each. This essential step ensures that the heat circulates and creates that desirable crispiness.
-
Top with Cheese: Generously sprinkle the cheese mixture over each pepperoni slice, aiming for an even layer to amplify that cheesy goodness.
-
Bake to Perfection: Slide the baking sheet into the preheated oven and bake for about 8-10 minutes. Keep a watchful eye as the cheese melts, bubbles, and achieves that golden-brown hue while the edges of the pepperoni crisps up beautifully.
-
Cool and Serve: Once baked, remove the crisps from the oven and allow them to cool on the baking sheet for a few minutes. This cooling period helps everything set magically before transferring them to a wire rack.
-
Enjoy: Serve immediately and watch them disappear! If desired, garnish with fresh parsley for a pretty touch.
If any leftover crisps linger, store them in an airtight container at room temperature and rejuvenate them either in a toaster oven or air fryer to bring back that crunch.
Chef’s Notes & Helpful Tips
-
Make-Ahead: You can prepare the cheese mixture ahead of time, keeping it sealed in the refrigerator for a day. Just remember to bring it to room temperature before baking.
-
Cooking Alternatives: If you’re in a hurry, an air fryer can deliver comparable results with a crunchier finish. Just keep an eye on them as they may cook faster.
-
Customization Ideas: Have fun mixing and matching your cheeses! Swap the cheddar for pepper jack for an added spice or throw in some crumbled feta for a unique twist.
Common Mistakes to Avoid
-
Overcrowding the Baking Sheet: This leads to unevenly cooked crisps. Always space them out properly so they can achieve that desired crunch.
-
Skipping the Cheese Mix: Don’t just sprinkle cheese haphazardly; mixing it ensures an optimal coating on each slice.
-
Not Keeping an Eye on the Oven: Cheese can go from bubbly to burnt in seconds. Stay close during the last few minutes.
What to Serve With Pepperoni Cheese Crisps
Looking for some delicious pairings? Here are some ideas that complement your pepperoni cheese crisps flawlessly:
-
Marinara Sauce: A classic dip that enhances the Italian flavor, offering a tangy contrast to the savory crisps.
-
Guacamole: Its creaminess perfectly balances the richness and adds a delightful freshness.
-
Olives: A platter of assorted olives brings a briny contrast; their sharpness rounds out the snacks beautifully.
-
Crisp Veggies: Consider serving alongside carrot sticks or bell pepper strips for a refreshing and crunchy contrast.
-
Cheese Platter: Create an elegant spread by pairing these crisps with artisan cheeses and fruits.
-
Salsa: Vibrant and zesty, salsa adds a lightness that balances the heaviness of the cheese.
-
Cold Beer or Wine: A refreshing beer or crisp white wine can elevate your crisps into a delightful snack pairing.
Storage & Reheating Instructions
To store your leftover crisps, simply place them in an airtight container at room temperature. Keep them stored for no longer than two days to maintain peak freshness. For longer-lasting, you could refrigerate, but they may lose their signature crunch.
When you’re ready to reheat, your best options are a toaster oven or air fryer. This revitalizes that coveted crunch, giving you fresh-like flavor in each bite.
Estimated Nutrition Information
Each serving (about 4 crisps) contains approximately:
- Calories: 220
- Total Fat: 15g
- Saturated Fat: 6g
- Cholesterol: 40mg
- Sodium: 500mg
- Protein: 10g
Varying ingredients or portion sizes will affect these values.
FAQs
-
Can I use different types of cheese?
Absolutely! Feel free to experiment with your favorite cheese blends. Just keep an eye on flavors and melting properties. -
How do I store leftovers?
Place them in an airtight container at room temperature for up to two days. For longer storage, refrigerate, but expect a slight loss in crispiness upon reheating. -
Can I make these in an air fryer?
Yes! An air fryer can yield fantastic results. Just watch the cooking time closely, as it may require less time than the oven. -
How can I spice them up?
Add extra red pepper flakes, or swap in spicy cheeses or sausage to give these crisps a kick. -
What occasions are these crisps suitable for?
They shine at game nights, parties, or as an indulgent snack when watching your favorite show. Their versatility knows no bounds!
Conclusion
There’s something incredibly satisfying about biting into a pepperoni cheese crisp. Each bite transports you to the moment of delightful crunch coupled with savory flavors, making it impossible to resist. So, why not treat yourself to this irresistible snack today? Gather your ingredients, preheat that oven, and prepare for cheesy, crispy euphoria. Enjoy the happiness that comes from creating something simple yet astonishingly delightful in your kitchen. Your taste buds will thank you!
Print
Pepperoni Cheese Crisps
- Prep Time: 10 minutes
- Cook Time: 10 minutes
- Total Time: 20 minutes
- Yield: 4 servings 1x
- Category: Snack
- Method: Baking
- Cuisine: Italian
- Diet: Gluten-Free
Description
Crispy, cheesy bites featuring bold pepperoni and a savory blend of three cheeses, perfect for snacking on any occasion.
Ingredients
- 1 cup shredded mozzarella cheese
- 1/2 cup shredded cheddar cheese
- 1/4 cup grated Parmesan cheese
- 40–50 slices of pepperoni (approximately 4 ounces)
- 1 teaspoon Italian seasoning
- 1/2 teaspoon garlic powder
- Optional: red pepper flakes
- Optional: fresh parsley, chopped
Instructions
- Preheat the oven to 375°F (190°C).
- Prepare the baking sheet lined with parchment paper or silicone baking mat.
- Mix the shredded mozzarella, cheddar, and Parmesan in a medium bowl.
- Season with Italian seasoning and garlic powder, adding red pepper flakes if desired.
- Prepare the pepperoni, cutting larger slices in half if needed.
- Arrange the pepperoni in a single layer on the baking sheet, leaving space between each.
- Top each pepperoni slice with the cheese mixture.
- Bake for about 8-10 minutes until the cheese is melted and golden brown.
- Cool for a few minutes before transferring to a wire rack.
- Enjoy immediately, optionally garnishing with fresh parsley.
Notes
Store leftovers in an airtight container at room temperature for up to two days. Reheat in a toaster oven or air fryer for best results.
Nutrition
- Serving Size: 1 serving
- Calories: 220
- Sugar: 1g
- Sodium: 500mg
- Fat: 15g
- Saturated Fat: 6g
- Unsaturated Fat: 6g
- Trans Fat: 0g
- Carbohydrates: 2g
- Fiber: 0g
- Protein: 10g
- Cholesterol: 40mg