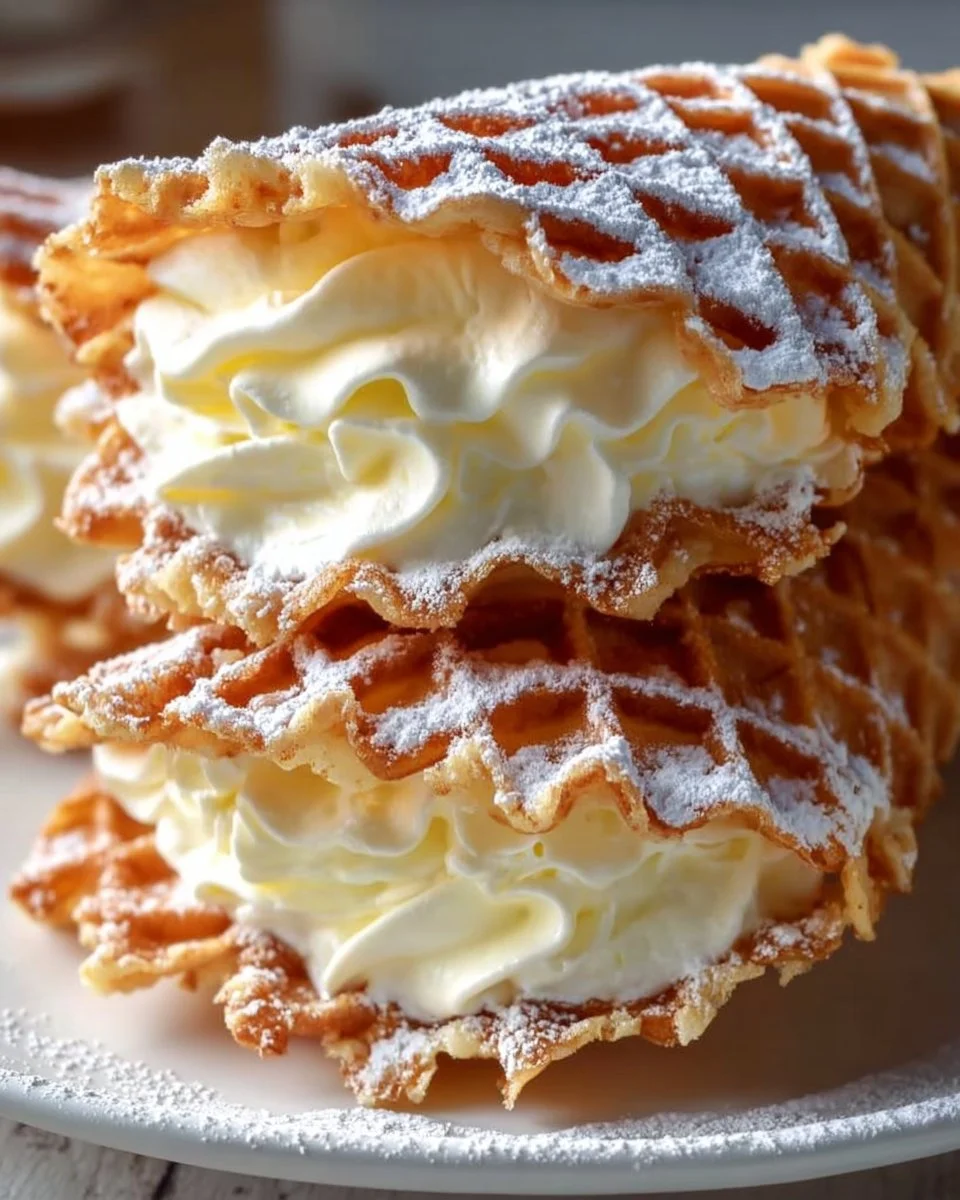
When you take your first bite of a crisp pizzelle cone filled with rich cream, a delightful journey begins in your mouth. The initial crunch gives way to a creamy, luscious filling that dances on your palate. Each element complements the other; the pizzelle’s lightness and delicate flavor enhance the velvety cream that envelops your senses. A hint of vanilla teases your nose, while the sweet and airy texture of the cone offers a playful contrast to the smooth filling. This isn’t just a treat; it’s an experience that transports you back to warm gatherings, laughter-filled kitchens, and cherished family traditions.
Imagine the childlike wonder as you hold your homemade pizzelle cone, knowing how much love and care went into crafting these little delights. The excitement of watching the pizzelle maker work its magic, transforming humble ingredients into delicate confections, fills your heart with joy. As you fill the cones with luxurious whipped cream, you can already envision the smiles of your loved ones as they savor each bite. These pizzelle cones are not just desserts; they are vessels of happiness, perfect for sharing moments of joy with those you hold dear.
Why You’ll Love This Pizzelle Cone Recipe
You’ll adore this recipe for many reasons. The pizzelle cones boast a harmonious combination of flavors and textures, offering a satisfying crunch with each bite. The sweet cream filling elevates the experience, making every moment spent indulging in these treats feel special. Whether you serve them at a family gathering, birthday celebration, or simply as a weekend delight, they will surely impress. Moreover, their delicate appearance and irresistible taste make them stand out at any occasion, turning a simple dessert into a cherished memory.
This recipe also invites creativity. You can swap out the vanilla for your favorite flavor, add a sprinkle of cocoa to the cream, or even infuse the batter with hints of citrus for a refreshing twist. The possibilities are endless, allowing you to personalize each cone to suit your preferences. So gather your loved ones and prepare to embark on a delicious adventure that celebrates both tradition and innovation.
Preparation Phase & Tools to Use
Before you dive into the delightful world of pizzelle cones, let’s make sure you have the right tools at your disposal. The most important is the pizzelle maker, a specialized appliance that creates those beautiful, lacy cookies. Look for a model that offers consistent heat for even cooking—this will ensure your cones come out perfectly crisp. A mixing bowl and whisk will help you combine your ingredients smoothly, while a spatula aids in the careful transfer of the batter to the pizzelle maker.
Here’s a pro tip: always keep a support tool handy, like a pair of tongs, to shape the pizzelle cones right after cooking. The cookies are easy to mold when warm, but they harden quickly as they cool. Be ready to act fast to achieve that perfect cone shape! Preparing your work area beforehand will streamline the process and let you focus on the fun of creating these delectable treats.
Ingredients for Pizzelle Cones with Rich Cream Filling
To craft these exquisite cones, gather the following ingredients:
- 2 cups all-purpose flour: This forms the base of your pizzelle, providing structure and crispness.
- 3 eggs: Eggs add richness and help bind the ingredients, giving the cones their delicate texture.
- 3/4 cup sugar: A touch of sweetness enhances the flavor and browning of the pizzelle.
- 1 cup butter, melted: Butter contributes to the richness and buttery flavor of the cones while ensuring a crisp finish.
- 1 teaspoon vanilla extract: The vanilla infuses each bite with warmth and depth, complementing the sweetness.
- 1 cup heavy cream: The star of the show! It forms the luxurious filling that will tantalize your taste buds.
- 1/4 cup powdered sugar: Powdered sugar sweetens the whipped cream and gives it a divine texture.
- 1 teaspoon vanilla extract (for filling): This adds an extra layer of flavor to your creamy filling.
Consider using gluten-free flour for a lighter, gluten-sensitive option without sacrificing the pizzelle’s signature crunch. Experiment by incorporating almond flour for a nutty twist that will enchant your taste buds.
How to Make Pizzelle Cones with Rich Cream Filling
- Preheat the pizzelle maker: Follow the manufacturer’s instructions to ensure it’s ready for action.
- Mix the batter: In a large bowl, whisk together the all-purpose flour, eggs, sugar, melted butter, and 1 teaspoon of vanilla extract until smooth and well combined. The consistency should be thick yet pourable, resembling a pancake batter.
- Cook the pizzelle: Drop a small amount of batter onto the pizzelle maker, ensuring it fills the center without overflowing. Close the lid and cook for about 30-60 seconds, or until the pizzelle turns golden brown. The smell will fill your kitchen, a warm embrace of vanilla and butter!
- Shape the cones: Carefully remove the pizzelle and immediately shape it into a cone while it’s still warm. Hold it firmly for a few seconds to let it cool and set into shape. Repeat with the remaining batter.
- Whip the cream: In a separate bowl, beat the heavy cream with the powdered sugar and the remaining teaspoon of vanilla extract. Whip until stiff peaks form, creating a thick, luscious filling that will hold beautifully in the cones.
- Fill the cones: Generously fill each pizzelle cone with the whipped cream, allowing a bit of it to overflow at the top for an extra indulgent touch.
- Serve and enjoy: Gather your friends and family, and watch their faces light up as they take their first bites!
Chef’s Notes & Helpful Tips
- Make-ahead tips: You can prepare the pizzelle cones a day in advance. Just make sure to store them in an airtight container to keep them crisp. However, whip the cream filling just before serving to ensure its freshness and delightful texture.
- Cooking alternatives: If you don’t have a pizzelle maker, you can try making these in a waffle iron; just be aware the texture will differ slightly. A thin, non-stick frying pan could also work but requires more careful monitoring.
- Customization ideas: Add a dash of espresso powder to the batter for a mocha flair or fold in finely chopped fruits like strawberries or raspberries into the whipped cream for a fruity twist.
Common Mistakes to Avoid
- Overcooking the pizzelle: Keep a close eye on the cooking time. Overcooked pizzelle can become too hard and challenging to shape. Aim for a golden-brown hue for a perfectly crisp texture.
- Failing to shape them quickly: The key to achieving the cone shape lies in acting while the pizzelle is still warm. Once cooled, they will become rigid, making shaping impossible.
- Skip measuring ingredients precisely: Baking is a science, and measuring accurately ensures consistency in texture and taste. Use dry measuring cups for flour and sugar to get it just right.
What to Serve With Pizzelle Cones
Elevate your dessert experience by pairing pizzelle cones with:
- Fresh berries: Sweet and tart strawberries, blueberries, or raspberries bring a refreshing contrast to the richness of the cream.
- Chocolate sauce: Drizzling warm chocolate sauce over your filled cones adds a luxurious, decadent touch.
- Coffee or espresso: Sipping a rich coffee alongside the cones enhances their vanilla flavors and creates a perfect afternoon treat.
- Fruit compote: Top your cones with a homemade fruit compote for a sophisticated twist and an explosion of flavor.
- Ice cream: For an indulgent treat, use your pizzelle cones as vessels for scoops of your favorite ice cream.
- Whipped chocolate ganache: A subtle chocolate whipped ganache provides a delicious complement, offering depth of flavor.
- Caramel sauce: Drizzling with caramel adds sweetness and a sticky, luscious finish that makes snacking all the more enjoyable.
- Nuts: A sprinkle of chopped nuts like pistachios, almonds, or hazelnuts adds a delightful crunch and extra flavor.
Storage & Reheating Instructions
Store any leftover pizzelle cones in an airtight container at room temperature. They maintain their crispness for up to two days. For longer storage, consider freezing the cones without the filling; they freeze beautifully for up to a month. Simply reheat them in a preheated oven at 350°F (175°C) for about 5-7 minutes to restore their crunchiness. Always whip the cream fresh to enjoy the best texture and taste.
Estimated Nutrition Information
This recipe yields approximately 12 pizzelle cones, with each cone containing about:
- Calories: 210
- Protein: 3g
- Carbohydrates: 25g
- Fat: 11g
- Sugar: 8g
Please note that these values are approximate and may vary depending on specific ingredients and methods used.
FAQs
1. Can I make pizzelle cones without a pizzelle maker?
Absolutely! While a pizzelle maker is ideal, you can use a waffle iron or non-stick frying pan. Just ensure you monitor the cooking time closely.
2. What’s the best way to fill the cones without making a mess?
Using a piping bag or a squeeze bottle helps control the filling process. This method allows you to fill each cone precisely without overflowing.
3. Can I use other flavorings for the whipped cream?
Yes! You can incorporate flavored extracts, cocoa powder, or even fruit purees to create unique whipped cream variations.
4. How do I know when the pizzelle is done cooking?
Look for a golden-brown color and a pleasant, sweet aroma. Gently lift the lid of the pizzelle maker to check; it should have a crispy texture.
5. Can I substitute ingredients for healthier options?
Yes! You can use whole wheat flour for added fiber and Greek yogurt instead of heavy cream for a lower-calorie filling. Experiment with different sweeteners to suit your dietary preferences.
Conclusion
There’s something undeniably heartwarming about the process of creating pizzelle cones filled with rich cream. The simplicity of the ingredients belies the depth of flavor and joy they bring. With each bite, you taste the love and care that fills not only the cones but the kitchen where they were made. So gather your family, invite your friends, and embark on this delicious journey. Your homemade pizzelle cones await, ready to deliver sweet moments of happiness and delight. Don’t just capture the experience—savor every crunchy, creamy moment!
Print
Pizzelle Cones with Rich Cream Filling
- Prep Time: 15 minutes
- Cook Time: 30 minutes
- Total Time: 45 minutes
- Yield: 12 cones 1x
- Category: Dessert
- Method: Baking
- Cuisine: Italian
- Diet: Vegetarian
Description
Delicious pizzelle cones filled with rich, whipped cream offering a delightful crunch and creamy experience.
Ingredients
- 2 cups all-purpose flour
- 3 eggs
- 3/4 cup sugar
- 1 cup butter, melted
- 1 teaspoon vanilla extract
- 1 cup heavy cream
- 1/4 cup powdered sugar
- 1 teaspoon vanilla extract (for filling)
Instructions
- Preheat the pizzelle maker according to the manufacturer’s instructions.
- Mix the batter: In a large bowl, whisk together the flour, eggs, sugar, melted butter, and 1 teaspoon vanilla extract until smooth.
- Cook the pizzelle by dropping a small amount of batter onto the pizzelle maker and cooking until golden brown, about 30-60 seconds.
- Shape the cones immediately after cooking while they are warm.
- Whip the cream with the powdered sugar and remaining vanilla extract until stiff peaks form.
- Fill each cone with the whipped cream, allowing some to overflow for an indulgent touch.
- Serve and enjoy your delightful creations!
Notes
Make-ahead tips: Prepare the pizzelle cones a day in advance, but whip the cream fresh before serving for the best texture.
Nutrition
- Serving Size: 1 cone
- Calories: 210
- Sugar: 8g
- Sodium: 200mg
- Fat: 11g
- Saturated Fat: 7g
- Unsaturated Fat: 3g
- Trans Fat: 0g
- Carbohydrates: 25g
- Fiber: 0g
- Protein: 3g
- Cholesterol: 50mg