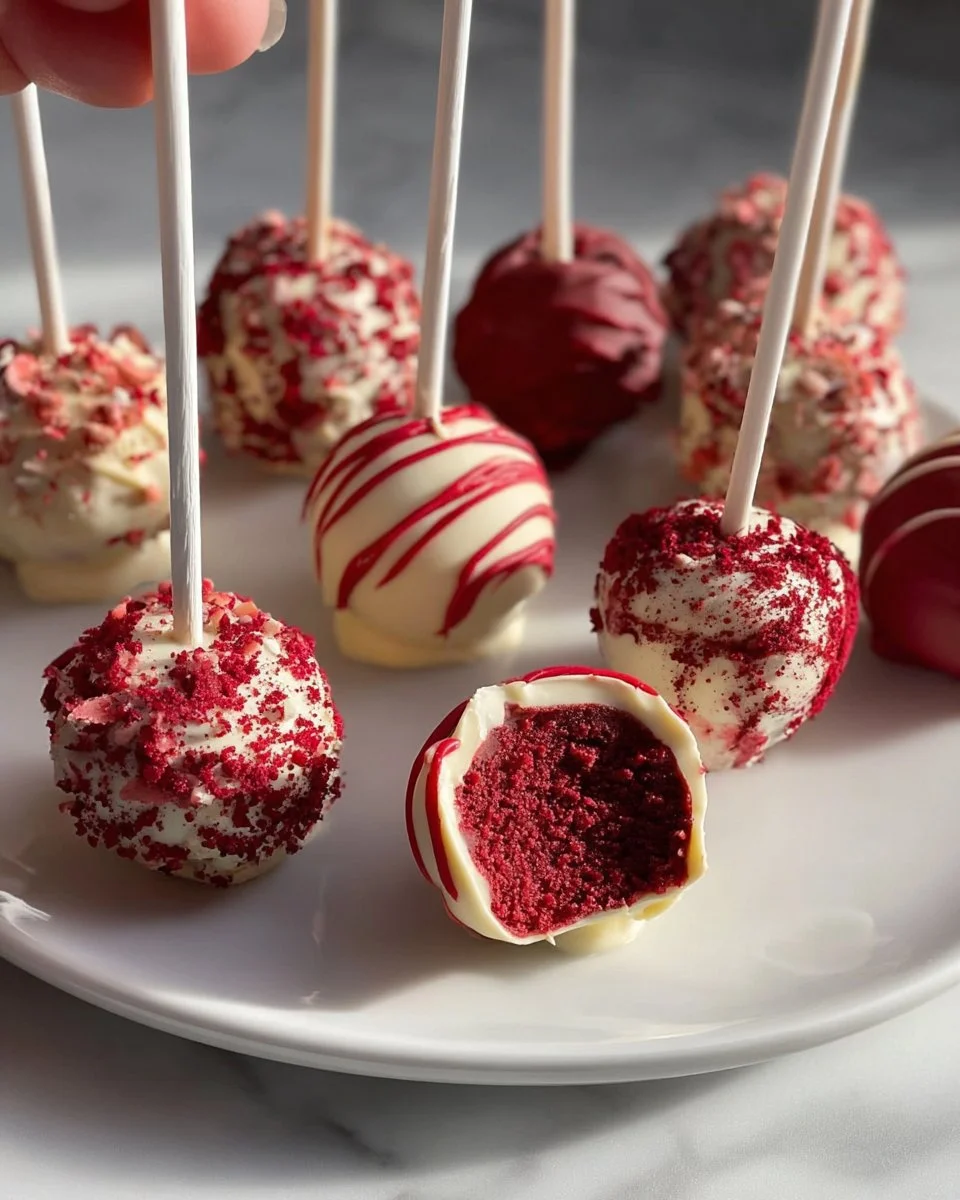
Indulging in a sweet treat can often feel like a magical experience, and when that treat is a Red Velvet Cake Pop, you will find yourself embarking on a delightful journey of texture and taste. Each bite begins with the soft, tender cake that crumbles beautifully in your mouth, melting into a harmonious blend of sweetness and subtle cocoa notes. The vibrant red hue promises excitement, hinting at a celebration waiting to be savored. As you indulge, the silky cream cheese coating hugs the cake pop, wrapping it in a luscious, velvety embrace that takes deliciousness to soaring new heights. Topped with delicate white chocolate drizzle or colorful sprinkles, each creation becomes a whimsical masterpiece, tempting you even before you take that first bite.
Picture this: a joyous celebration, perhaps a birthday, graduation, or simply a cozy gathering with loved ones. As guests mingle and laughter fills the air, your delectable Red Velvet Cake Pops become the centerpiece of the table, drawing everyone closer. The moment they lift one from its stand, they experience a sensory delight—an enticing aroma mingling with eager anticipation. One bite unleashes a burst of flavor that is both familiar and novel, capturing the essence of a classic red velvet cake in a pop-sized marvel. Their size is perfect; small enough for indulgent snacking yet divine enough to leave a memorable impression.
Why You’ll Love This Red Velvet Cake Pop Recipe
What makes these cake pops stand out? Let’s start with the vibrant color—deep scarlet on the outside, inviting and warm. The flavor profile dances between rich cocoa and the creamy tang of cream cheese frosting, creating a taste that feels decadent yet balanced. These cake pops are not just a feast for the senses; they serve as delightful treats capable of bringing joy to any occasion. Baking these beauties allows for endless opportunities to connect with loved ones, whether you’re celebrating a special moment, sharing joy with neighbors, or simply pampering yourself after a long week.
The beauty of Red Velvet Cake Pops lies in their versatility. These pops are not just a dessert; they can be charming gifts wrapped in colorful cellophane, fun additions to party platters, or a colorful way to sweeten a gloomy day. Their delightful bite-sized portions make them perfect for sharing, ensuring no one feels guilty about having just one…or perhaps two. Each pop sings with a lovely combination of flavors, setting them apart from ordinary sweets and inviting everyone into a world of flavor-filled delight.
Preparation Phase & Tools to Use
To create these gorgeous Red Velvet Cake Pops, gather the following essential tools that make the process a breeze:
- Mixing Bowls: Use various sizes for different preparation stages, ensuring consistency in mixing.
- Baking Sheet or Cake Pan: A properly greased or lined baking pan is crucial to achieving that perfect bake with minimal sticking.
- Cookie Scoop: This handy tool helps shape uniform cake pops, ensuring an even baking experience and snack satisfaction.
- Melting Pot or Microwave-Safe Bowl: Ideal for melting the chocolate coating thoughtfully, enhancing the pops’ rich flavor.
- Cake Pop Sticks: Choose sturdy sticks to create a strong foundation for each pop, adding an elegant touch.
To prepare effectively, begin by setting everything out before you start baking; this makes for a smoother process. Preheat your oven to ensure it reaches the required temperature while you mix your ingredients, enhancing the texture of your Red Velvet Cake. Pull on your favorite apron and get ready for a sweet adventure.
Ingredients for Red Velvet Cake Pops
Creating these vibrant treats requires a delightful selection of ingredients:
- All-Purpose Flour: The backbone of the cake, providing structure with a light, tender crumb.
- Granulated Sugar: Sweetens the cake and balances the cocoa bitterness, contributing to that irresistible moistness.
- Cocoa Powder: Provides depth with its rich, chocolatey flavor, complementing the unique profile of red velvet.
- Baking Powder and Baking Soda: Essential leavening agents that ensure the cake rises beautifully.
- Salt: A tiny pinch elevates flavors, balancing the sweetness.
- Vegetable Oil: Keeps the cake moist and adds tenderness, making each bite a soft delight.
- Buttermilk and Eggs: These key ingredients introduce a tangy richness that enhances the overall flavor.
- Vinegar and Vanilla Extract: The vinegar enhances the reaction with cocoa, intensifying the taste, while vanilla rounds it all out.
- Cream Cheese Frosting: The star that holds everything together and gives that signature creamy tang to the pops.
- Melting Chocolate or Candy Melts: A luxurious coating, acting as the final touch, ensuring each pop is beautifully dipped and decorated.
Should you wish to substitute any ingredients, you could replace all-purpose flour with a gluten-free blend and use Greek yogurt for a tangy twist instead of buttermilk. The versatility of this recipe encourages creativity!
How to Make Red Velvet Cake Pops
Making these delightful pops can turn into a cherished tradition. Follow these clear steps, and you’ll soon find yourself enveloped in the rich aroma of baking:
-
Preheat Your Oven: Start by preheating your oven to 350°F (175°C). Nothing beats the inviting aroma of freshly baked cake wafting through your home.
-
Combine Dry Ingredients: In a large mixing bowl, sift together 2 cups of all-purpose flour, 1 cup of granulated sugar, 1 tablespoon of cocoa powder, 1 teaspoon of baking powder, 1 teaspoon of baking soda, and a pinch of salt. This combination ensures a balanced, flavorful cake.
-
Mix Wet Ingredients: In a separate bowl, whisk together 1 cup of vegetable oil, 1 cup of buttermilk, 2 large eggs, 2 tablespoons of red food coloring, 1 teaspoon of vanilla extract, and 1 teaspoon of white vinegar. This mixture infuses your cake with moisture and vibrant color.
-
Combine Mixtures: Gradually mix the wet ingredients into the dry ingredients, stirring until just combined. Avoid over-mixing; this leads to denser cake pops.
-
Bake the Cake: Pour the batter into a greased cake pan and bake for about 25-30 minutes or until a toothpick inserted into the center comes out clean. Allow it to cool completely.
-
Crumb the Cake: Once cool, crumble the cake into fine crumbs in a large bowl.
-
Add Frosting: Mix in about 1 cup of cream cheese frosting into the crumbs. Adjust the frosting to achieve a moldable texture—you’re aiming for a wet dough consistency.
-
Form the Pops: Use a cookie scoop to portion out the mixture, rolling it into smooth balls. Refrigerate the balls for about 30 minutes to firm up.
-
Melt the Coating: In a microwave-safe bowl, melt your selected chocolate or candy melts in short bursts, stirring in between until smooth.
-
Dip the Sticks: Dip the end of each cake pop stick into the melted chocolate before inserting it into each cake ball. This prevents them from falling off later.
-
Dip and Decorate: Dip each cake pop into the melted chocolate, allowing excess to drip off. Decorate with sprinkles or drizzle more chocolate on top before setting them upright in a foam block or a cake pop stand.
-
Chill: Allow the pops to cool and set completely before enjoying them to their fullest temptation!
Chef’s Notes & Helpful Tips
- Make These Ahead: Cake pops can be made up to a week in advance. Store them in the fridge for a refreshing treat whenever the craving hits.
- Cooking Alternatives: An air fryer can elevate these cake pops with a crispy outer layer. Cook at a low temperature to ensure they heat through without burning.
- Customization Ideas: Explore flavors by adding orange zest or almond extract for an unexpected twist. Vegan alternatives can also be made using applesauce instead of eggs.
Common Mistakes to Avoid
- Overmixing the Batter: Resist the urge to overmix once you combine wet and dry ingredients—it leads to tough cake pops!
- Incorrect Consistency: If the cake dough is too dry, add more frosting. If it’s too wet, incorporate more cake crumbs for balance.
- Insufficient Cooling Time: Ensure your cake has cooled completely before crumbling. Warm cake can lead to gummy cake pops.
What to Serve With Red Velvet Cake Pops
Consider these delightful pairings as you present your cake pops:
- Creamy Coffee: Pair with a smooth cappuccino or latte for a delightful mid-afternoon pick-me-up.
- Milkshake: A luscious vanilla or chocolate milkshake captures childhood nostalgia and complements the sweetness of the pops.
- Fresh Fruit: Sweet strawberries or tart raspberries add a refreshing note that balances the richness of the cake pops.
- Ice Cream: A scoop of vanilla bean ice cream offers a whimsical contrast in temperature and flavor.
- Sparkling Tea: Effervescent tea with a hint of fruit enhances the cake pop experience, perfect for celebrations.
- Cheese Platter: Include soft cheeses that pair well with the sweetness for a sophisticated touch.
Storage & Reheating Instructions
To preserve the integrity of your cake pops, store them in an airtight container in the fridge for up to one week. For longer storage, freeze them for up to three months. When ready to enjoy, let them thaw in the fridge overnight—no need to reheat; they taste divine when cold!
Estimated Nutrition Information
Each Red Velvet Cake Pop has approximately:
- Calories: 160
- Total Fat: 8g
- Total Carbohydrates: 22g
- Protein: 2g
Please note that values will vary based on specific ingredients used and portion sizes.
FAQs
Can I use a cake mix instead of making the cake from scratch?
Absolutely! A red velvet cake mix can simplify the process while still yielding delicious results. Just follow the instructions on the box and combine the pops as described.
Can I substitute cream cheese frosting for something else?
Certainly! If you prefer a sweeter or healthier alternative, vanilla buttercream also works well or even a chocolate ganache if you want to make it super chocolaty!
How do I know when the cake is perfectly baked?
Insert a toothpick into the center; it should come out clean or with a few crumbs attached. Avoid overbaking, as it can dry out the cake.
What can I do with leftover cake pops?
Leftover cake pops can be crumbled and used as a topping for cupcakes, ice cream, or yogurt, introducing a flavorful crunch!
Can these cake pops be shipped?
While they can be shipped, it’s best to freeze them first. Wrap them securely in bubble wrap and keep them cool to ensure they arrive intact.
Conclusion
The joy of creating Red Velvet Cake Pops extends far beyond the simple baking process; it transforms into a cherished experience filled with color, flavor, and excitement. Each bite transports you to a happy place—one where laughter echoes and delicious treats are embraced with open arms. So, roll up your sleeves, gather your loved ones, and embark on this delicious adventure. You won’t just create pops; you’ll create unforgettable memories. Let’s get baking!
Print
Red Velvet Cake Pops
- Prep Time: 30 minutes
- Cook Time: 30 minutes
- Total Time: 60 minutes
- Yield: 20 cake pops 1x
- Category: Dessert
- Method: Baking
- Cuisine: American
- Diet: Vegetarian
Description
Indulge in delightful Red Velvet Cake Pops, featuring soft tender cake melded with cream cheese frosting and a colorful chocolate coating.
Ingredients
- 2 cups all-purpose flour
- 1 cup granulated sugar
- 1 tablespoon cocoa powder
- 1 teaspoon baking powder
- 1 teaspoon baking soda
- Pinch of salt
- 1 cup vegetable oil
- 1 cup buttermilk
- 2 large eggs
- 2 tablespoons red food coloring
- 1 teaspoon vanilla extract
- 1 teaspoon white vinegar
- 1 cup cream cheese frosting
- Melting chocolate or candy melts
Instructions
- Preheat your oven to 350°F (175°C).
- In a large mixing bowl, sift together the flour, sugar, cocoa powder, baking powder, baking soda, and salt.
- In a separate bowl, whisk together the vegetable oil, buttermilk, eggs, red food coloring, vanilla extract, and vinegar.
- Gradually mix the wet ingredients into the dry ingredients until just combined.
- Pour the batter into a greased cake pan and bake for 25-30 minutes or until a toothpick comes out clean.
- Once cool, crumble the cake in a large bowl and mix in the cream cheese frosting.
- Shape the mixture into balls using a cookie scoop and refrigerate for 30 minutes.
- Melt the chocolate or candy melts in a microwave-safe bowl.
- Dip the end of each cake pop stick in the melted chocolate and insert it into each cake ball.
- Dip each cake pop into the melted chocolate and decorate with sprinkles or additional melted chocolate.
- Set the pops in a foam block or cake pop stand and chill until set.
Notes
Cake pops can be made up to a week in advance. Store in an airtight container in the fridge or freeze for longer storage.
Nutrition
- Serving Size: 1 cake pop
- Calories: 160
- Sugar: 15g
- Sodium: 300mg
- Fat: 8g
- Saturated Fat: 3g
- Unsaturated Fat: 5g
- Trans Fat: 0g
- Carbohydrates: 22g
- Fiber: 1g
- Protein: 2g
- Cholesterol: 30mg